React Blog - Implementing Login System with egg-jwt
React Blog Series
What is JWT?
egg-jwt
Installing egg-jwt
yarn add egg-jwt
Configuring egg-jwt
- Configure the
config/plugin.jsfile
exports.jwt = {
  enable: true,
  package: 'egg-jwt'
};
- Configure the
config/config.default.jsfile
// The secret key used to sign the information
config.jwt = {
  secret: 'xxxxxx'
};
Example
Generating a token for login on the backend
- Routing layer
Add jwt to the second argument to implement authorization for this route.
The jwt in the code is a custom middleware called auth.js, which will be explained in the next section.
'use strict';

/**
 * @param {Egg.Application} app - egg application
 */
module.exports = app => {
  const { router, controller, middleware, config } = app;
  const { admin } = controller.admin;
  const jwt = middleware.auth(config.jwt);
  router.post('/admin/login', admin.login);
  // Add jwt to the second argument for routes that require authorization
  router.get('/admin/get_type_list', jwt, admin.getTypeList);
};
- Controller layer
Use jwt.sign(dataToEncrypt, secret, [options, callback]) to generate a token.
For relevant configurations, refer to jsonwebtoken
async login() {
    const { app, ctx } = this;
    const { username, password } = ctx.request.body;
    const checkValidate = await ctx.service.admin.admin.checkUserValidate(username, password);
    if (checkValidate) {
        // Sign and encrypt the information to generate a token, expiresIn (token expiration time)
        const token = app.jwt.sign({ username, password }, app.config.jwt.secret, { expiresIn: '2h' });
        ctx.body = {
            code: '0001',
            msg: 'Login successful',
            token,
        };
    } else {
        ctx.body = {
            code: '0002',
            msg: 'Incorrect username or password, please try again!',
        };
    }
}
- Service layer
async checkUserValidate(username, password) {
  const isValidate = await this.app.mysql.get('admin', { username, password });
  return !!isValidate;
}
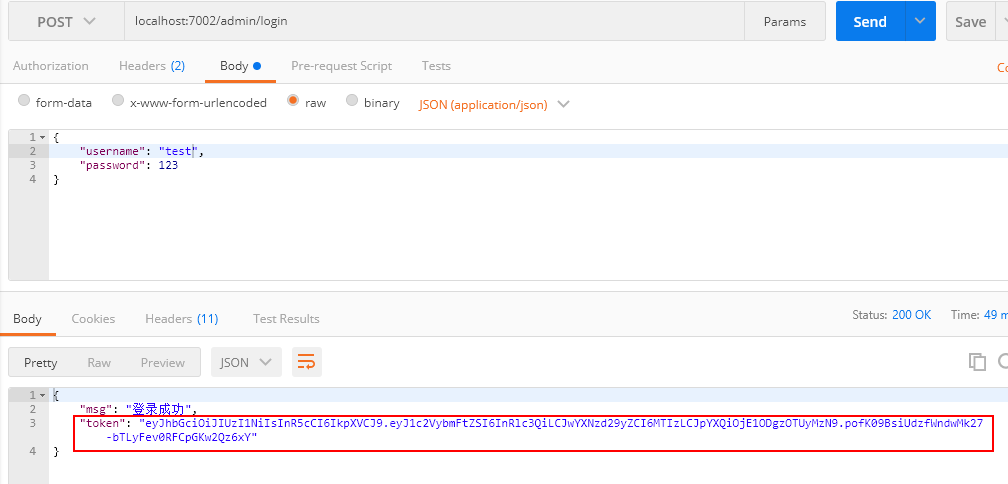
- Testing with Postman

Return the generated token to the frontend and use localStorage.setItem to save the token locally.
Authorization by passing token from the frontend
Wrap axios
Create a new file for axios to wrap around axios. Use axios interceptors to automatically include token data in headers with each request, and the backend can use jwt.verify to validate the correctness of the token.
axios.js
import axios from 'axios';

axios.interceptors.request.use(config => {
  // Token saved locally after successful login
  const token = localStorage.getItem('token');
  config.headers.Authorization = `Bearer ${token}`;
  return config;
});

axios.interceptors.response.use(response => {
  // Code set by the backend interface
  const { code } = response.data;
  if (code === '0003' || code === '0004') {
    window.location.href = '/login';
  }
  return response;
});

export default axios;
After wrapping, always use this wrapped version of axios for requests.
Backend validation handling
auth.js
'use strict';

module.exports = options => {
  return async function auth(ctx, next) {
    // Get the token passed from the frontend using axios
    const token = ctx.header.authorization;
    if (token) {
      try {
        // Validate and decode the token
        const decode = ctx.app.jwt.verify(token.split(' ')[1], options.secret);
        console.log(decode);
        await next();
      } catch (error) {
        console.log(error.name);
        if (error.name === 'JsonWebTokenError' || error.name === 'TokenExpiredError') {
          // There are many possible errors here: 1. token error, 2. token expired... handle them all as authorization failures
          ctx.body = {
            code: '0003',
            msg: 'User authorization failed, please log in again.'
          };
        } else {
          throw error;
        }
      }
    } else {
      ctx.body = {
        code: '0004',
        msg: 'You are not logged in, please log in first.'
      };
    }
  };
};
The backend uses the /middleware/auth.js middleware to implement authorization for the required interfaces. It verifies the token data passed from the frontend using jwt.verify to identify the login status. Unify error handling for JsonWebTokenError, because auth.js is a middleware, any other errors that occur in the interface will also be caught here. For errors that are not JsonWebTokenError, simply throw the error.